System Administrator Guide
Introduction
This guide, designed for a System Administrator, covers installation and setup of the Web Curator Tool. An electronic copy can be downloaded from the WCT Github site: http://dia-nz.github.io/webcurator/
For information on using the Web Curator Tool, see the Web Curator Tool Quick Start Guide and the Web Curator Tool online help.
Contents of this document
Following this introduction, the Web Curator Tool System Administrator Guide includes the following sections:
- Getting Started - covers prerequisites, supported platforms, other platforms, and optional prerequisites for using the Web Curator Tool.
- Setting up the WCT database - procedures for setup using Oracle, MySQL and PostgreSQL.
- JMX setup - procedures for setting up JMX for different WCT components.
- Setting up the WCT Application Servers - procedures for deploying WCT to Tomcat, includes configuration options and troubleshooting.
- Setting up Heritrix 3 - procedures for building and running the Heritrix 3 web crawler to intergrate with WCT, includes configuration options and troubleshooting.
- Appendix A: Creating a truststore and importing a certificate
- Appendix B: The OMS archive adapter
Getting Started
The following section explains how to get the Web Curator Tool up and running.
Prerequisites
The following are required to successfully install and run the Web Curator Tool:
Java 1.8 JDK or above (64bit recommended)
During development of the latest version it was noted that large harvests would sometimes fail to transfer from the Harvest Agent to Store on completion. This was resolved by running Apache Tomcat with 64 bit Java.
Apache Tomcat 8.x.x or above (the application has been tested on Tomcat 8.5.32)
A database server (select one of the databases below)
- Oracle 11g or newer
- PostgreSQL 8.4.9 or newer
- MySQL 5.0.95 or newer
Other versions of the required products may be compatible with the Web Curator Tool but they have not been tested. Due to the products use of Hibernate for database persistence other database platforms should work, if the product is rebuilt with the correct database dialect. However only Postgesql, Oracle 11g, and MySQL have been tested.
Supported platforms
The following platforms have been used during the development of the Web Curator Tool:
- Sun Solaris 10
- Red Hat Linux EL3.
- Ubuntu GNU/Linux 16.04 LTS
- Windows 7 Ultimate
Other platforms
The following platforms were used during the Development of the Web Curator tool but are not explicitly supported:
- Windows 2000, Windows XP Pro, Windows Server 2003
Optional prerequisites
The following prerequisites are optional:
- LDAP compliant directory (for external authentication)
- Apache Maven 3+ (required to build from source).
- Git (can be used to clone the project source from Github)
Setting up the WCT database
Currently the WCT has been tested with Oracle 11g, MySQL 5.0.95, MariaDB 10.0.36 and PostgreSQL 8.4.9 and 9.6.11.
Setup using Oracle
This guide assumes you have installed and configured Oracle 11g prior to setting up the WCT database and schema.
Setup two schemas: one called DB_WCT that owns the tables and one called USR_WCT that the application uses to query the tables. The USR_WCT schema should have limited rights. You can use the following SQL script to do this:
db/latest/setup/wct-create-oracle.sql
Run the following SQL scripts under the DB_WCT user or SYSTEM account:
db/latest/setup/wct-schema-oracle.sql

db/latest/setup/wct-schema-grants.sql

db/latest/setup/wct-indexes-oracle.sql

db/latest/setup/wct-bootstrap-oracle.sql

db/latest/setup/wct-qa-data-oracle.sql
The wct-qa-data-oracle.sql script will generate QA indicator template data for the new QA module for each agency, and should be run once all agencies have been added to WCT. Note that if the script is re-run, it will clear out any existing template data.
- Locate the correct JDBC driver for Oracle, which should be
distributed with the Oracle install media.
- The JDBC driver should be called ojdbc1411g.jar
- The driver will need to be placed into the $TOMCAT_HOME/common/lib/ directory.
- Also required in this directory is the jta.jar
Notes: A password strategy should be defined for the system, and the db_wct & usr_wct passwords should be changed in the scripts and application property files to conform to this strategy. To encourage this, the passwords in the supplied database creation script are set to ‘password’.
The bootstrap user script creates a User with a name of ‘bootstrap’ and a password of ‘password’. Use this account to login to the application once it is up and running. You can use the bootstrap account to create other users and agencies. Once you have setup valid users, it is best to disable the bootstrap user for security reasons.
Setup using PostgreSQL
This guide assumes you have installed and configured PostgreSQL prior to setting up the WCT database and schema.
Setup two schema, using the following script:
db/latest/setup/wct-create-postgres.sql
Then run the following SQL scripts under the DB_WCT user:
db/latest/setup/wct-schema-postgresql.sql

db/latest/setup/wct-schema-grants-postgresql.sql

db/latest/setup/wct-indexes-postgresql.sql

db/latest/setup/wct-bootstrap-postgresql.sql

db/latest/setup/wct-qa-data-postgres.sql
The wct-qa-data-postgres.sql script will generate QA indicator template data for the new QA module for each agency, and should be run once all agencies have been added to WCT. Note that if the script is re-run, it will clear out any existing template data.
- The Postgres JDBC driver is included in the Github repository under
/etc/ directory.
- The Postgres driver is called postgresql-8.1-404.jdbc3.jar
- The driver will need to be placed into the $TOMCAT_HOME/common/lib/ directory.
- Also required in the $TOMCAT_HOME/common/lib/ directory is the jta.jar
Notes: A password strategy should be defined for the system, and the usr_wct password should be changed in the scripts and application property files to conform to this strategy. To encourage this, the password in the supplied database creation script is set to ‘password’.
The bootstrap user script creates a User with a name of ‘bootstrap’ and a password of ‘password’. Use this account to login to the application once it is up and running. You can use the bootstrap account to create other users and agencies. Once you have setup valid users, it is best to disable the bootstrap user for security reasons.
Setup using MySQL
This guide assumes you have installed and configured MySQL prior to setting up the WCT database and schema.
Create the database, using the following script:
db/latest/setup/wct-create-mysql.sql
Then run the following SQL scripts under the root user:
db/latest/setup/wct-schema-mysql.sql

db/latest/setup/wct-schema-grants-mysql.sql

db/latest/setup/wct-indexes-mysql.sql

db/latest/setup/wct-bootstrap-mysql.sql

db/latest/setup/wct-qa-data-mysql.sql
The wct-qa-data-mysql.sql script will generate QA indicator template data for the new QA module for each agency, and should be run once all agencies have been added to WCT. Note that if the script is re-run, it will clear out any existing template data.
- Download the MySQL JDBC driver from the MySQL website.
- The driver will need to be placed into the $TOMCAT_HOME/common/lib/ directory.
- Also required in the $TOMCAT_HOME/common/lib/ directory is the jta.jar
Notes: A password strategy should be defined for the system, and the usr_wct password should be changed in the scripts and application property files to conform to this strategy. To encourage this, the password in the supplied database creation script is set to ‘password’.
The bootstrap user script creates a User with a name of ‘bootstrap’ and a password of ‘password’. Use this account to login to the application once it is up and running. You can use the bootstrap account to create other users and agencies. Once you have setup valid users, it is best to disable the bootstrap user for security reasons.
JMX setup
WCT core and every Harvest Agent require JMX Remote access. This means that JMX Remote control and access files will need to be setup for the JVM. This is done with the following steps:
Create a jmxremote.password file by copying the file jmxremote.password.template to the jmx remote password file that your installation will use. This template file will be in your JDK’s jrelibmanagement directory.
You can use the property `-Dcom.sun.management.jmxremote.password.file=<property-file>` to point to a different location.
The monitor role and control role have passwords associated with them. These are setting withing hte jmx remote password file:
monitorRole  apassword
controlRole  apassword
It is important that this file is protected. If using Windows, refer to the following link to protect the file using the O/S: http://java.sun.com/j2se/1.5.0/docs/guide/management/security-windows.html
If using *nix platform, protect the file using:
chmod 600 jmxremote.password.
Enable the JMX Remote port used in the JVM’s startup. Any high port can be used as long as it is unique on the machine that is running the component. The example here uses port 9004, but if multiple components are running on the same machine, then each component will need a different and unique port number.
For Tomcat, this is done by adding the following to your $TOMCAT_HOME/bin/catalina.sh script:
JAVA_OPTS=-Dcom.sun.management.jmxremote.port=9004
For a Harvest Agent, the Harvest Agent would need to include the -Dcom.sun.management.jmxremote.port=9004 as part of the Java command line or by including it in the Java environment variable JAVA_OPTS.
IMPORTANT: Make sure your JMX port is unique. Different components of WCT will be running JMX so they will need to be configured to use different ports.
Setting up the WCT Application Servers
Deploying WCT to Tomcat
There are three major components to the deployment of the Web Curator Tool:
- the web curator core (wct.war)
- the web curator harvest agent (wct-harvest-agent.war)
- the web curator digital asset store (wct-store.war).
Each of these three components must be deployed for the Web Curator Tool to be fully functional and more than one harvest agent can be deployed if necessary. Each Harvest Agent is capable of carrying out harvest actions. The more harvest agents deployed the more harvesting that can be done at any one point in time. The harvest agents and digital asset store can reside on any machine within the network, as they use SOAP over HTTP to communicate with each other.
To deploy WCT to Tomcat:
- Make sure you have installed and configured both Java 1.8 JDK and Apache-Tomcat 8.x.x successfully.
- Set up the JMX Remote control and access files for the WCT core as described in the section JMX setup.
- Deploy the WAR files into Tomcat. The simplest deployment is to
deploy all three WAR files into the same Tomcat container.
- You can copy the WAR files into the $TOMCAT_HOME/webapps/ directory.
- Provided Tomcat is configured correctly, when you start Tomcat the WAR files will be exploded and the application will start.
- Shut down Tomcat once the WAR files have been extracted. This will allow you to modify the configuration files in the following steps.
Configure the Database Connection
The open source version of the Web Curator Tool is configured to use a local PostgreSQL database. If you are using any other database, or are using a database server, you will need to change the database configuration.
Set the correct database dialect in TOMCAT/webapps/wct/WEB-INF/classes/wct-core.properties:
#Hibernate Settings

hibernate.dialect=org.hibernate.dialect.PostgreSQLDialect
hibernate.default_schema=DB_WCT
The appropriate dialects are shown in the table below.
Database Dialect Oracle org.hibernate.dialect.OracleDialect PostgreSQL org.hibernate.dialect.PostgreSQLDialect MySQL org.hibernate.dialect.MySQLDialect Edit the context.xml file in TOMCAT/webapps/wct/META-INF:
<?xml version="1.0" encoding="UTF-8"?>
<Context>
    <Resource
        name="jdbc/wctDatasource"
        type="javax.sql.DataSource"
        password="**PASSWORD**"
        driverClassName="**DRIVER**"
        maxIdle="2"
        maxWait="5000"
        validationQuery="**VALIDATION_QUERY**"
        username="**USERNAME**"
        url="**JDBC_URL**"
        maxActive="10 "/>
</Context>
Set the username and password properties as appropriate for your database. If you have followed the defaults, then these should remain as USR_WCT/USR_WCT.
The remaining properties should be set as follows:
Oracle
Attribute Value DRIVER oracle.jdbc.driver.OracleDriver VALIDATION_QUERY select count(1) from DUAL JDBC_URL jdbc:oracle:thin:@servername:port/SID PostgreSQL
Attribute Value DRIVER org.postgresql.Driver VALIDATION_QUERY select 1+1 JDBC_URL jdbc:postgresql://servername:port/database MySQL
Attribute Value DRIVER com.mysql.jdbc.Driver VALIDATION_QUERY select 1+1 JDBC_URL jdbc:mysql://servername:port/database Copy the context.xml file to the TOMCAT/conf/Catalina/localhost directory. Delete the existing wct.xml file if it exists. Now rename the context.xml file to wct.xml.
Configure LDAP Authentication (Unencrypted)
If you wish to use an external Directory for Authentication, then WCT should be configured to allow this. Unencrypted authentication can be done very simply with your directory by modifying the wct-core-security.xml and the wct-core.properties file.
The Directory must support LDAP.
In wct-core-security.xml, uncomment the ldapAuthenticator bean:
<bean id="authenticationManager"
class="org.acegisecurity.providers.ProviderManager" abstract="false"
singleton="true" lazy-init="default" autowire="default"
dependency-check="default">
    <property name="providers">
        <list>
            <ref bean="ldapAuthenticator" />
            <ref bean="daoAuthenticationProvider" />
        </list>
    </property>
</bean>
In wct-core.properties, set the following parameters:
#LDAP Settings
ldap.url=ldap://yourldaphost.domain.com:389
ldap.dn=cn={0},OU=OrgUnit,O=Organisation
The two parameters of interest are:
- ldap.url, which defines the URL for the directory. This is normally something like ldap://mydirectory.natlib.co.nz/
- ldap.dn. This allows the Directory DN to be defined. For example, if a user logs in with the username “gordonp” the Directory will be queried using the distinguished name of “cn=gordonp, ou=wct, o=global”. So the user must exist within the global organisation and the wct organisation unit.
Configure LDAP Authentication (Encrypted using TLS or SSL)
If you want all credentials passed to the Directory server to be protected then the ldap traffic should be encrypted using TLS or SSL.
The only difference to the wct-core.properties file from step 4 is the following change:
ldap.url=ldaps://yourldaphost.domain.com:389
If using TLS or SSL then you must configure Tomcat to allow secure communication with your Directory by adding the following to your $TOMCAT_HOME/bin/catalina.sh script:
JAVA_OPTS= -Djavax.net.ssl.trustStore=/var/wctcore/ssl/wct.ts
-Djavax.net.ssl.trustStorePassword=password
This points tomcat to a Truststore that contains the public key for you directory. If your directory utilises a correctly signed certificate, you may not need this, as the default truststore provided by Java contains all the major root certificates. However if you directory uses a self-signed certificate then you will need to export the public key of that certificate and import it into your truststore (i.e. /var/wctcore/ssl/wct.ts). Alternatively you can import the self-signed certificate into the default Java truststore.
For details on how to create a truststore and import a certificate, see Appendix A: Creating a truststore and importing a certificate.
Configure the Digital Asset Store
Set the Base Directory of the Digital Asset Store to a valid location on the server. Also make sure the directory or share has enough free disk space.
The configuration for the DAS is found in the wct-das.properties file:
#WctCoreWsEndpoint

wctCoreWsEndpoint.service=/wct/services/urn:WebCuratorTool
wctCoreWsEndpoint.host=localhost
wctCoreWsEndpoint.port=8080

#ArcDigitalAssetStoreService

# the base directory for the arc store
arcDigitalAssetStoreService.baseDir=/tmp/arcstore
Configure a Heritrix 3 - Harvest Agent
Make sure the following parameters are correct for your environment in the wct-agent.properties file:
#HarvestAgent

# name of the directory where the temporary harvest data is stored
harvestAgent.baseHarvestDirectory=/wct/harvest-agent
# agent host name or ip address that the core knows about
harvestAgent.host=localhost
# the port the agent is listening on for http connections
harvestAgent.port=8080
# the name of the harvest agent web service
harvestAgent.service=/harvest-agent-h3/services/urn:HarvestAgent
# the name of the harvest agent log reader web service
harvestAgent.logReaderService=/harvest-agent-h3/services/urn:LogReader
# the max number of harvest to be run concurrently on this agent
harvestAgent.maxHarvests=2
# the name of the agent. must be unique
harvestAgent.name=My local H3 Agent
# the note to send with the harvest result.
harvestAgent.provenanceNote=Original Harvest
# the number of alerts that occur before a notification is sent
harvestAgent.alertThreshold=200
# whether to attempt to recover running harvests from H3 instance on startup.
harvestAgent.attemptHarvestRecovery=true


#HarvestCoordinatorNotifier

# the name of the core harvest agent listener web service
harvestCoordinatorNotifier.service=/wct/services/urn:WebCuratorTool
# the host name or ip address of the core
harvestCoordinatorNotifier.host=localhost
# the port that the core is listening on for http connections
harvestCoordinatorNotifier.port=8080


#DigitalAssetStore

# the name of the digital asset store web service
digitalAssetStore.service=/wct-store/services/urn:DigitalAssetStore
# the host name or ip address of the digital asset store
digitalAssetStore.host=localhost
# the port that the digital asset store is listening on for http connections
digitalAssetStore.port=8080

...

#Triggers

# startDelay: delay before running the job measured in milliseconds
# repeatInterval: repeat every xx milliseconds (Note that once a day is
86,400,000 millseconds)

heartbeatTrigger.startDelay=10000
heartbeatTrigger.repeatInterval=30000
In addition to setting the Harvest Agent parameters, you may also want to change the default Heritrix v3 profile that is shipped with the WCT. See the Default profile section.
Configure a Heritrix 1 - Harvest Agent
Make sure the following parameters are correct for your environment in the wct-agent.properties file:
#HarvestAgent

# name of the directory where the temporary harvest data is stored
harvestAgent.baseHarvestDirectory=/wct/harvest-agent
# agent host name or ip address that the core knows about
harvestAgent.host=localhost
# the port the agent is listening on for http connections
harvestAgent.port=8080
# the name of the harvest agent web service
harvestAgent.service=/harvest-agent-h1/services/urn:HarvestAgent
# the name of the harvest agent log reader web service
harvestAgent.logReaderService=/harvest-agent-h1/services/urn:LogReader
# the max number of harvest to be run concurrently on this agent
harvestAgent.maxHarvests=2
# the name of the agent. must be unique
harvestAgent.name=My local H1 Agent
# the note to send with the harvest result.
harvestAgent.provenanceNote=Original Harvest
# the number of alerts that occur before a notification is sent
harvestAgent.alertThreshold=200


#HarvestCoordinatorNotifier

# the name of the core harvest agent listener web service
harvestCoordinatorNotifier.service=/wct/services/urn:WebCuratorTool
# the host name or ip address of the core
harvestCoordinatorNotifier.host=localhost
# the port that the core is listening on for http connections
harvestCoordinatorNotifier.port=8080


#DigitalAssetStore

# the name of the digital asset store web service
digitalAssetStore.service=/wct-store/services/urn:DigitalAssetStore
# the host name or ip address of the digital asset store
digitalAssetStore.host=localhost
# the port that the digital asset store is listening on for http connections
digitalAssetStore.port=8080

...

#Triggers

# startDelay: delay before running the job measured in milliseconds
# repeatInterval: repeat every xx milliseconds (Note that once a day is
86,400,000 millseconds)

heartbeatTrigger.startDelay=20000
heartbeatTrigger.repeatInterval=30000
In addition to setting the Harvest Agent parameters, you may also want to change the default Heritrix v1.14 profile that is shipped with the WCT. The most likely settings to change are what web proxy server to use when harvesting content. The setting can be found in the WEB-INF/classes/default-profile.xml:
<newObject name="HTTP" class="org.archive.crawler.fetcher.FetchHTTP">
    <boolean name="enabled">true</boolean>
    <map name="filters">
    </map>
    <map name="midfetch-filters">
    </map>
    <integer name="timeout-seconds">1200</integer>
    <integer name="sotimeout-ms">20000</integer>
    <long name="max-length-bytes">0</long>
    <boolean name="ignore-cookies">false</boolean>
    <boolean name="use-bdb-for-cookies">true</boolean>
    <string name="load-cookies-from-file"></string>
    <string name="save-cookies-to-file"></string>
    <string name="trust-level">open</string>
    <stringList name="accept-headers">
    </stringList>
    <string name="http-proxy-host"></string>
    <string name="http-proxy-port"></string>
    <string name="default-encoding">ISO-8859-1</string>
    <boolean name="sha1-content">true</boolean>
    <boolean name="send-connection-close">true</boolean>
    <boolean name="send-referer">true</boolean>
    <boolean name="send-range">false</boolean>
</newObject>
If you don’t have a web proxy then just leave the values blank.
Heritrix v1.14 does not currently support authenticated proxy access, so the proxy server must allow unauthenticated access.
Set the Attachments Directories
- Set the attachments directories in the server-config.wsdd files for all three components. This file is found in the WEB-INF directory of each application. This directory must exist and be accessible by the Tomcat server.
<parameter name="attachments.Directory" value="/tmp/attach"/>
Logon to WCT
Once you have started up the Web Curator Tool logon to the application using the ‘bootstrap’ user with the default password of ‘password’. This account has enough privilege to create other Agencies and Users within the system. Once you have configured valid WCT users and tested their login’s work, you should disable the bootstrap user.
The URL to access WCT running on Apache/Tomcat will be similar to the one displayed below:
http://localhost/wct/ where ‘localhost’ can be replaced with your server name. Note, if using tomcat only, the default port for tomcat is 8080, changing the URL to http://localhost:8080/wct/ will allow you to connect directly to Tomcat.
- Heritrix v1 Harvest Agent use only
The other common trap is not defining the default bandwidth for the system. On start-up of WCT the system bandwidth is set to 0 KB’s for every day of the week. Before Harvests can be initiated you must specify a base bandwidth for each of the days you plan to harvest on.
In order to setup the bandwidth you must logon as a user that has the ‘Manage Web Harvester System’ privilege set (usually an WCT Administrator). The Bandwidth screen can be found under the ‘Management -> Harvester Configuration -> Bandwidth’ section of the site.
Troubleshooting setup
See the following table to troubleshoot Web Curator Tool setup.
| Problem | Possible solution |
|---|---|
| Database connection failure | Check that the WCT core data source is defined correctly in the wct/META-INF/context.xml and that the server can communicate with this host on the specified port. |
| LDAP configuration failure | If problems occur with getting TLS working with ldap, then switch on the SSL debug mode within Tomcat by adding the following to the JAVA_OPTS environment variable. The debug will display on the console. -Djavax.net.debug=ssl |
| JMX remote register failure | Tomcat will not start if the permissions are incorrect on the jmxremote.password file. Check that the jmxremote.password file exists and has the correct ownership. |
| Communication failure on Heartbeat | Validate that the distributed agents have the correctly defined central host and can communicate with this host over HTTP. |
| Failure on storing the harvest to the store | Validate that the Digital Asset Store has been configured with the correct directory settings and has write access to the specified directory. |
| Failure on Harvest attempt (or Harvest action appears to hang) | 2006-07-04 07:51:31,640 ERROR [http-8080-Processor24] agent.HarvestAgentHeritrix (HarvestAgentHeritrix.java:88) - Failed to initiate harvest for 262147 : Failed to create the job profile C:tmpharvest-agent262147ord er.xml. org.webcurator.core.harvester.a gent.exception.HarvestAgentExcept ion: Failed to create the job profile C:tmpharvest-agent262147o rder.xml. at org.webcurator.core.harvester.a gent.HarvestAgentHeritrix.createP rofile(HarvestAgentHeritrix.java: 542) at org.webcurator.core.harvester.a gent.HarvestAgentHeritrix.initiat eHarvest(HarvestAgentHeritrix.jav a:79) at org.webcurator.core.harvester.a gent.HarvestAgentSOAPService.init iateHarvest(HarvestAgentSOAPServi ce.java:37) If any error similar to the one above occurs, it is usually related to an incomplete harvest taking place. If this occurs you will need to remove the Target Instance sub-directory from the deployed baseHarvestDirectory as specified in the wct-agent.xml. In the example above you would delete the directory called c:tmpharvest-agent262147 |
| QA Process does not appear to run or QA indicators are not generated | Check that QA indicators have been defined in the Management tab of WCT. The \sqlwct-qa-data-1_6-[mysql/orac le/postgres].sql scripts have been provided to generate initial values for the QA indicators. |
| Harvests fail with null pointer exception | If the following error message appears in the logs: java.lang.NullPointerException at org.archive.crawler.admin.Cra wlJobHandler.loadJobs(CrawlJo bHandler.java:251) at org.archive.crawler.admin.Cra wlJobHandler.<init>(CrawlJobH andler.java:221) The tomcat user (e.g. tomcat, tomcat6, tomcat7) does not have permission to write to the folder Heritrix is using to store harvests in progress. Add one of the following to the tomcat startup scripts or that user’s environment setup script: -Dheritrix.jobsdir=/var/wct/agent Or -Dheritrix.home=/var/wct/agent -Dheritrix.jobsdir=jobs The heritrix.jobsdir must be an absolute path (i.e. starting with a “/”) otherwise the heritrix.home folder needs to be specified as well. |
Configuration options
This section describes options for configuring the Web Curator Tool.
Web Curator Core - context.xml
The /META-INF/context.xml
<?xml version="1.0" encoding="UTF-8"?>
<Context>
    <Resource
        name="jdbc/wctDatasource"
        type="javax.sql.DataSource"
        password="${schema.password}"
        driverClassName="${schema.driver}"
        maxIdle="${schema.maxIdle}"
        maxWait="5000"
        validationQuery="${schema.query}"
        username="${schema.user}"
        url="${schema.url}"
        maxActive="${schema.maxActive}"
    />
</Context>
This file defines the data source to use for the WCT and specifies the JDBC driver class, database URL, username, password, max and min connections and the keep alive query. The parameters surrounded by ${ } characters are replaced when this file is built using maven, with the appropriate values from the build.properties at build time, or wct-core.properties files at run time.
Web Curator Core - wct-core.xml
The /WEB-INF/classes/wct-core.xml
<bean id="schedulePatternFactory"
class="org.webcurator.domain.SpringSchedulePatternFactory">
    <property name="patterns">
        <list>
        <bean class="org.webcurator.domain.model.core.SchedulePattern">
            <property name="scheduleType" value="1"/>
            <property name="description" value="Every Monday at 9:00pm"/>
            <property name="cronPattern" value="00 00 21 ? * MON *"/>
        </bean>
        </list>
    </property>
</bean>
The schedulePatternFactory defines all the default CRON patterns used by the WCT to schedule Targets for harvest. For each additional SchedulePattern required an additional SchedulePattern bean should be added to the list.
<bean id="politePolitenessOptions" class="org.webcurator.core.profiles.PolitenessOptions"
abstract="false" singleton="true" lazy-init="default" autowire="default" dependency-check="default">
    <!-- Delay Factor -->
    <constructor-arg index = "0" type = "double" value = "10.0"/>
    <!-- Min Delay milliseconds -->
    <constructor-arg index = "1" type = "long" value = "9000"/>
    <!-- Max Delay milliseconds -->
    <constructor-arg index = "2" type = "long" value = "90000"/>
    <!-- Respect crawl delay up to seconds -->
    <constructor-arg index = "3" type = "long" value = "180"/>
    <!-- Max per host bandwidth usage kb/sec -->
    <constructor-arg index = "4" type = "long" value = "400"/>
</bean>

<bean id="mediumPolitenessOptions" class="org.webcurator.core.profiles.PolitenessOptions"
abstract="false" singleton="true" lazy-init="default" autowire="default" dependency-check="default">
    <!-- Delay Factor -->
    <constructor-arg index = "0" type = "double" value = "5.0"/>
    <!-- Min Delay milliseconds -->
    <constructor-arg index = "1" type = "long" value = "3000"/>
    <!-- Max Delay milliseconds -->
    <constructor-arg index = "2" type = "long" value = "30000"/>
    <!-- Respect crawl delay up to seconds -->
    <constructor-arg index = "3" type = "long" value = "30"/>
    <!-- Max per host bandwidth usage kb/sec -->
    <constructor-arg index = "4" type = "long" value = "800"/>
</bean>

<bean id="aggressivePolitenessOptions" class="org.webcurator.core.profiles.PolitenessOptions"
abstract="false" singleton="true" lazy-init="default" autowire="default" dependency-check="default">
    <!-- Delay Factor -->
    <constructor-arg index = "0" type = "double" value = "1.0"/>
    <!-- Min Delay milliseconds -->
    <constructor-arg index = "1" type = "long" value = "1000"/>
    <!-- Max Delay milliseconds -->
    <constructor-arg index = "2" type = "long" value = "10000"/>
    <!-- Respect crawl delay up to seconds -->
    <constructor-arg index = "3" type = "long" value = "2"/>
    <!-- Max per host bandwidth usage kb/sec -->
    <constructor-arg index = "4" type = "long" value = "2000"/>
</bean>
The PolitenessOptions define the Heritrix 3 politeness settings. These values are shown in the UI when editing a Heritrix 3 profile, and are used to adjust whether a crawl will be performed in an aggressive, moderate or polite manner.
Web Curator Core - wct-core.properties
The /WEB-INF/classes/wct-core.properties
# name of the directory where the h3 scripts are stored
h3.scriptsDirectory=/tmp/h3scripts
See Scripts directory under Setting up Heritrix 3.
#HarvestCoordinator settings

harvestCoordinator.minimumBandwidth=10
harvestCoordinator.maxBandwidthPercent=80
harvestCoordinator.daysBeforeDASPurge=14
harvestCoordinator.daysBeforeAbortedTargetInstancePurge=7
The harvestCoordinator is responsible for the coordination of harvest activity across all of the Harvest Agents. This is where the minimum bandwidth (in KB/s) and maximum bandwidth percentages are defined for all agents. Also defined in the Co-ordinator is the number of days before the Digital Asset Store is purged as well as the number of days before data remaining after aborted harvests is purged.
harvestCoordinator.harvestOptimizationEnabled=true
harvestCoordinator.harvestOptimizationLookaheadHours=12
harvestCoordinator.numHarvestersExcludedFromOptimisation=1
The harvest coordinator is able to “optimize” harvests that are configured to be optimizable. Optimizable harvests will begin earlier than their scheduled time, when the harvests can support the extra harvest, and when the scheduled time is within the look-ahead window configuration. A number of harvesters can also be excluded from optimization, to allow for non-optimizable harvests to execute on schedule.
Targets can be configured as optimizable on the target edit screen.
Note also that there is also the ability to prevent harvest optimization during certain hours, based on the bandwidth settings, in the Management->Bandwidth area.
processScheduleTrigger.startDelay=10000
processScheduleTrigger.repeatInterval=30000
The processScheduleTrigger defines when the heartbeat activity is checked on the registered Agents. The time is measured in milliseconds.
#MailServer settings

mailServer.smtp.host=yourhost@yourdomain.co.uk
mail.smtp.port=25
The mailServer bean is responsible for communicating with an SMTP mail server for sending email notifications.
#InTrayManager settings

inTrayManager.sender=noreply@yourdomain.com
inTrayManager.wctBaseUrl=http://localhost:8080/wct/
The inTrayManager is responsible for informing users of Tasks or Notification messages. This uses the mailServer to send email. Also defined here is the sender of the automated system Tasks and Notifications.
#GroupSearchController settings

groupSearchController.defaultSearchOnAgencyOnly=true
The groupSearchController defines how the default search is handled on the Groups tab. When defaultSearchOnAgencyOnly is set to true, the user name is omitted from the default Group search filter allowing the display of all groups for the current user’s agency. When defaultSearchOnAgencyOnly is set to false, the user name is included in the filter and only those Groups owned by the current user are displayed.
#ArchiveAdapter settings

archiveAdapter.targetReferenceMandatory=false
The archiveAdapter The archive adapter provides the mechanism for archiving a harvested target instance into an archive repository. When targetReferenceMandatory is set to true (or is omitted), the owning Target for a Target Instance being archived must have a Target Reference defined in order for archiving to be attempted. When targetReferenceMandatory is set to false, there is no need for the owning Target to have a Target Reference defined.
#QualityReviewToolController settings

qualityReviewToolController.enableBrowseTool=true
qualityReviewToolController.enableAccessTool=false
qualityReviewToolController.archiveUrl=http://web.archive.org/web/*/
qualityReviewToolController.archiveName=Wayback
qualityReviewToolController.archive.alternative=http://web.archive.org/web/*/
qualityReviewToolController.archive.alternative.name=Another Wayback

#HarvestResourceUrlMapper settings

#Used to rewrite urls to use an external Quality Review Tool. Note that for use
#with Wayback, the Wayback indexer should be enabled in wct-das.properties
#Available substitution values:

# {$HarvestResult.Oid}
# {$HarvestResult.HarvestNumber}
# {$HarvestResult.State}
# {$HarvestResult.CreationDate,yyyyMMdd}
# {$HarvestResult.DerivedFrom}
# {$HarvestResult.ProvenanceNote}
# {$HarvestResource.Oid}
# {$HarvestResource.Name}
# {$HarvestResource.Length}
# {$HarvestResource.StatusCode}
# {$ArcHarvestResource.FileDate}

harvestResourceUrlMapper.urlMap=http://localhost.archive.org:8080/wayback
/wayback/{$ArcHarvestResource.FileDate}/{$HarvestResource.Name}
The QualityReviewToolController settings control whether the standard browse tool, and external access tool, or both are available to the user. The ArchiveUrl setting specifies the location of the archive access tool, to allow the user to view copies of the target already stored in the archive. The ArchiveName is the name displayed on the review screen. The archive.alternative allows the use of a second review tool, with it’s corresponding name. The alternative can be commented out in the configuration if it is not required.
The harvestResourceUrlMapper is responsible for writing the access tool URLs in with the review tool using a custom url and replacing elements of that url with the correct items in the harvest resource.
The urlMap property of the harvestResourceUrlMapper can have any of the following substituted value from the harvest resource:
- {$HarvestResource.Name}
- {$HarvestResource.Length}
- {$HarvestResource.Oid}
- {$HarvestResource.StatusCode}
- {$ArcHarvestResource.FileDate}
- {$HarvestResult.CreationDate[,DateFormat]}
- {$HarvestResult.DerivedFrom}
- {$HarvestResult.HarvestNumber}
- {$HarvestResult.Oid}
- {$HarvestResult.ProvenanceNote}
- {$HarvestResult.State}
The HarvestResult.CreationDate substitution’s format can be controlled by supplying a valid simple date format after a comma within the curly brackets e.g. {$HarvestResult.CreationDate,ddMMyy } for 1 Nov 2008 will show “011108”.
The QualityReviewController.enableAccessTool and HarvestResourceUrlMapper settings can be used to allow Wayback to be used as an access tool for the WCT; either instead of, or in addition to the standard Browse tool. An example of how this may be achieved is detailed on the WCT Wiki. See https://github.com/DIA-NZ/webcurator/wiki/Wayback-Integration.
Note that if Wayback is being used as an access tool, the WaybackIndexer must be enabled and configured (see wct-das.properties below and https://github.com/DIA-NZ/webcurator/wiki/Wayback-Integration).
Web Curator Core - wct-core-security.xml
The wct-core-security.xml contains all of the security, Authentication and Authorisation settings to be used by the Web Curator Tool.
<bean id="authenticationManager"
class="org.acegisecurity.providers.ProviderManager" abstract="false"
singleton="true" lazy-init="default" autowire="default"
dependency-check="default">
    <property name="providers">
        <list>
            <ref bean="ldapAuthenticator" />
            <ref bean="daoAuthenticationProvider" />
        </list>
    </property>
</bean>
This is where the LDAPAuthenticator can be plugged in if the Tool is to use an external Directory service for Authentication. In wct-core.properties, set the following parameters:
#LDAP Settings
ldap.url=ldap://yourldaphost.domain.com:389
ldap.dn=cn={0},OU=OrgUnit,O=Organisation
Web Curator Digital Asset Store - wct-das.properties
#WctCoreWsEndpoint

wctCoreWsEndpoint.service=/wct/services/urn:WebCuratorTool
wctCoreWsEndpoint.host=localhost
wctCoreWsEndpoint.port=8080
This section of the file specifies the service, hostname and port for the WCTCore component.
#ArcDigitalAssetStoreService

# the base directory for the arc store
arcDigitalAssetStoreService.baseDir=/wct/store

# The file mover type to use for this installation (uncomment only one
line).
# For use when the DAS attachments directory is on a different
filesystem than the store directory.
arcDigitalAssetStoreService.dasFileMover=inputStreamDasFileMover
# For use when the DAS attachments directory is on the same filesystem
than the store directory.
##arcDigitalAssetStoreService.dasFileMover=renameDasFilemover

# The archive type to use for this installation (one of: fileArchive,
omsArchive, dpsArchive).
arcDigitalAssetStoreService.archive=fileArchive
This section of the file specifies the location where Archives are stored on the file system. The Digital Asset store holds these files for a period of time before they are purged. See the wct-core.properties file for the purge parameters.
Using the File Archive Adapter (Default option)
#File Archive

fileArchive.archiveRepository=/wct/filestore
fileArchive.archiveLogReportFiles=crawl.log,progress-statistics.log,local-errors.log,runtime-errors.log,uri-errors.log,hosts-report.txt,mimetype-report.txt,responsecode-report.txt,seeds-report.txt,processors-report.txt
fileArchive.archiveLogDirectory=logs
fileArchive.archiveReportDirectory=reports
fileArchive.archiveArcDirectory=arcs
The FileArchive writes files to a file system when they are archived. This directory should be permanent storage that is backed up, as these files are the definitive web archives that user wishes to store for prosperity.
Using other Archive Adapters
Other archive adapters may be specified by modifying the arcDigitalAssetStoreService.archive property. Current available types are fileArchive, omsArchive, dpsArchive.
Additional Indexers
#WaybackIndexer

# Enable this indexer
waybackIndexer.enabled=false
# Frequency of checks on the merged folder (milliseconds)
waybackIndexer.waittime=1000
# Time to wait for the file to be indexed before giving up
(milliseconds)
waybackIndexer.timeout=300000
# Location of the folder Wayback is watching for auto indexing
waybackIndexer.waybackInputFolder=/tmp/wayback/arcs
# Location of the folder where Wayback places merged indexes
waybackIndexer.waybackMergedFolder=/tmp/wayback/index-data/merged
# Location of the folder where Wayback places failed indexes
waybackIndexer.waybackFailedFolder=/tmp/wayback/index-data/failed

#CDXIndexer
# Enable this indexer
cdxIndexer.enabled=false
This section of the file allows configuration of additional indexers, which run concurrently with the standard WCT indexer. There are currently two additional indexers available (both disabled by default):
- WaybackIndexer configures WCT to make copies of the ARC or WARC files and move them to the waybackInputFolder for automatic indexing by an installed Wayback instance. Wayback will eventually deposit a file of the same name in either the waybackMergedFolder (if successful) or the waybackFailedFolder (if unsuccessful). This action triggers the indexing complete message.
- CDXIndexer generates a CDX index file in the same folder as the ARC/WARC files. When a target instance is submitted to the archive, the CDX index will be copied along with the ARC/WARC file(s).
Web Curator Harvest Agent - wct-agent.properties
The configuration for the Heritrix 1 and Heritrix 3 harvest agent is stored within the /WEB-INF/classes/wct-agent.properties file.
#HarvestAgent

# name of the directory where the temporary harvest data is stored
harvestAgent.baseHarvestDirectory=/wct/harvest-agent
# agent host name or ip address that the core knows about
harvestAgent.host=localhost
# the port the agent is listening on for http connections
harvestAgent.port=8080
# the name of the harvest agent web service
harvestAgent.service=/harvest-agent-h3/services/urn:HarvestAgent
# the name of the harvest agent log reader web service
harvestAgent.logReaderService=/harvest-agent-h3/services/urn:LogReader
# the max number of harvest to be run concurrently on this agent
harvestAgent.maxHarvests=2
# the name of the agent. must be unique
harvestAgent.name=My local Agent
# the note to send with the harvest result.
harvestAgent.provenanceNote=Original Harvest
# the number of alerts that occur before a notification is sent
harvestAgent.alertThreshold=200
The HarvestAgent is responsible for specifying where the harvest agent is located and its name. This is also where the agent specifies the maximum number of concurrent harvests it can carry out.
# whether to attempt to recover running harvests from H3 instance on startup.
harvestAgent.attemptHarvestRecovery=true
The attemptHarvestRecovery is responsible for triggering a harvest recovery in the Heritrix 3 Harvest Agent. This checks for running harvests in WCT-Core and Heritrix 3 and resumes them. This allows for restarting of the H3 Harvest Agent without orphaning the running jobs in Heritrix 3.
#HarvestCoordinatorNotifier

# the name of the core harvest agent listener web service
harvestCoordinatorNotifier.service=/wct/services/urn:WebCuratorTool
# the host name or ip address of the core
harvestCoordinatorNotifier.host=localhost
# the port that the core is listening on for http connections
harvestCoordinatorNotifier.port=8080
The harvestCoordinatorNotifier section is used to specify how the Harvest Agent should communicate back to the WCT Core.
#DigitalAssetStore

# the name of the digital asset store web service
digitalAssetStore.service=/wct-store/services/urn:DigitalAssetStore
# the host name or ip address of the digital asset store
digitalAssetStore.host=localhost
# the port that the digital asset store is listening on for http
connections
digitalAssetStore.port=8080
The digitalAssetStore section is used to specify how the Harvest Agent communicates back to the Digital Asset Store.
#MemoryChecker

# The amount of memory in KB that can be used before a warning
notification is sent
memoryChecker.warnThreshold=512000
# The amount of memory in KB that can be used before an error
notification is sent
memoryChecker.errorThreshold=640000

#ProcessorCheck

# The minimum percentage of processor available before a warning
notification is sent
processorCheck.warnThreshold=30
# The minimum percentage of processor available before an error
notification is sent
processorCheck.errorThreshold=20

#DiskSpaceChecker

# the percentage of disk used before a warning notification is sent
diskSpaceChecker.warnThreshold=80
# the percentage of disk used before an error notification is sent
diskSpaceChecker.errorThreshold=90
The three checker beans allow the Harvest Agent to monitor Disk, Processor and Memory. Each of the checkers are configurable to allow different alert and error thresholds. A Notification event will be sent on either the alert or error threshold being exceeded.
From release 1.5.2 onwards, the processorCheck bean has been disabled by default. This was done by commenting out the relevant line in the file wct-agent.xml as follows;
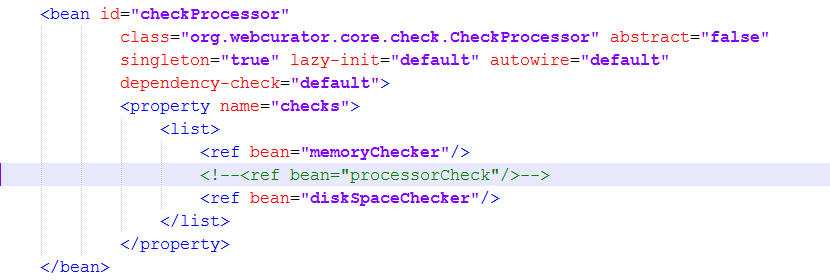
It should be noted that the processorCheck bean actually runs the following Unix command line utility to determine processor utilisation - (this command fails when running on Windows hosts);
“sar -u”
Web Curator Harvest Agent - wct-agent.xml
The configuration for the harvest agent is stored within the /WEB-INF/classes/wct-agent.xml file.
If this harvest agent can only harvest material for a set number of agencies, then they can be listed in the allowedAgencies property. An empty list implies that any Agency can use the Harvest Agent. The configuration below shows two agencies defined
<property name="allowedAgencies">
    <list>
        <value>National Library of New Zealand</value>
        <value>British Library</value>
    </list>
</property>
Web Curator Tool - SOAP Service Configuration
The /WEB-INF/server-config.wsdd
All three components have a server-config.wsdd file. This file is used by Apache Axis to configure the SOAP services used within the Web Curator Tool.
The only attribute that should be modified in the Axis configuration is the location of the temporary directory that Axis should use for attachments. Make sure that this directory exists and is accessible to the Apache Tomcat server.
<parameter name="attachments.Directory" value="/tmp/attach"/>
Setting up Heritrix 3
Integration with WCT
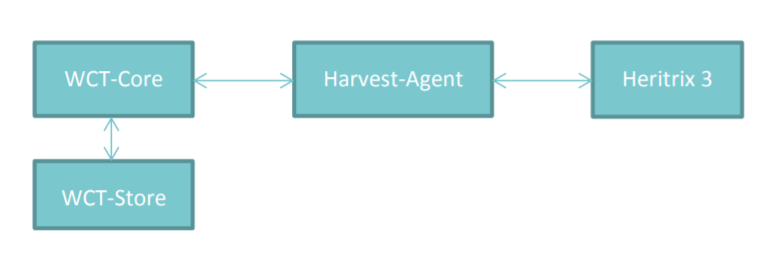
Heritrix 3 (H3) integrates with WCT through the new H3-Harvest-Agent. As an interface between WCT-Core and Heritrix 3, the Harvest Agent has three primary functions:
- actioning crawl commands from the WCT UI (start, stop, pause, abort).
- retrieving job status updates from Heritrix 3, to send onto WCT-Core.
- copying completed harvest files from Heritrix 3 job directory to WCT-Store.
Previously Heritrix (v1.14) was bundled within the Harvest Agent, as a .jar dependency. Heritrix 3 is now a standalone application external from WCT.
The H3 Harvest Agent requires a corresponding Heritrix 3 instance to be running. If Heritrix 3 is not runnning then new Target Instances will fail to start crawling.
Prerequisites
Java - A minimum of Java 7 is required. However due to an https issue with H3, it is recommended to and run it using Java 8.
For simplicity, it is recommended to run Heritrix 3 using the same Java version as WCT, which is now 64bit Java 8.
Download
The Heritrix 3 Github wiki contains a section detailing the current master builds available https://github.com/internetarchive/heritrix3/wiki#master-builds
For the latest official stable builds visit: https://builds.archive.org/job/Heritrix-3/lastStableBuild/org.archive.heritrix%24heritrix/
Note - the official releases available in the Github repository are not up to date, with the latest being 3.2.0
Other versions
Heritrix 3.3.0-LBS-2016-02 - From the National Library of Iceland, a stable version based on the Heritrix 3.3.0 master from May 2016. https://github.com/internetarchive/heritrix3/wiki#heritrix-330-lbs-2016-02-may-2016
Building from source
Optionally, Heritrix 3 can be built from source. Use the Github repository: https://github.com/internetarchive/heritrix3/
Maven is required to build the project
The build of the Heritrix3 crawler is done from the directory that contains the cloned Heritrix3 github repository.
It’s recommended to skip the tests when building the Heritrix3 crawler as they can take a considerable amount of time to run (many minutes to hours).
mvn clean install -DskipTests=true
The build produces a heritrix-<heritrix-version>-SNAPSHOT-dist.zip in ./dist/target.
Unzip this zip in the parent folder of $HERITRIX_HOME.
Configuration
Location
It is recommened to run Heritrix 3 as close to it’s corresponding H3 Harvest Agent as possible, i.e. the same server. Running Heritrix 3 and the H3 Harvest Agent on separate servers has not been tested.
Memory
If Heritrix 3 and it’s corresponding Harvest Agent are running on the same server as WCT Core and Store, then Heritrix 3 may need greater memory allocation.
Or depending on how many concurrent harvests you want to allow the H3 Harvest Agent to run, increasing the memory allocation for Heritrix 3 might be required.
Place the following lines near the top of heritrix-3.3.0/bin/heritrix
#Java Configuration
JAVA_OPTS=" -Xms256m -Xmx1024m"
Or set the JAVA_OPTS environment variable on the command line prior to running the Heritrix startup script:
export JAVA_OPTS=" -Xms256m -Xmx1024m"
Jobs directory
Heritrix 3 creates a folder in it’s job directory for each new job. After the registering
of a new job in Heritrix 3 by the H3 Harvest Agent, the Agent completes the initial setup
by copying the crawl profile (crawler-beans.cxml) and seeds (seeds.txt) into the
new job folder.
The Apache Tomcat running the H3 Harvest Agent must have read and write access to the top level jobs directory (and any child job folders) for Heritrix 3.
On completion or termination of a Heritrix 3 job, the H3 Harvest Agent will attempt to clean up by removing the job folder.
The Heritrix 3 jobs directory must remain separate from the H3 Harvest Agent harvestAgent.baseHarvestDirectory. If the same directory is used, an empty profile will be given to Heritrix 3, causing a job to fail.
Scripts directory
The H3 scripts directory is used for storing pre-defined Heritrix 3 scripts (js, groovy, beanshell) that WCT makes available for use through the scripting console window. These scripts can be run against harvests running on Heritrix 3.
- The directory needs to be readable by the user running Tomcat.
- The directory path needs to be set in wct-core.properties.
For more information, please see:
Default profile
There are only a select group of Heritrix 3 profile settings available through the WCT UI to configure. If configuration of additional settings is required, then the default Heritrix 3 profile used by WCT can be edited. This is only recommened for advanced users.
The default profile is located in the project source:
harvest-agent-h3/build/defaultH3Profile.cxml
The H3 Harvest Agent must be re-built to include any changes to the default profile.
Care must be taken if editing the default profile xml. The WCT Heritrix 3 profile editor relies on a select group of xml elements being present and correctly formatted. The following list of xml elements must remain untouched in the xml. Other properties can be edited.
- Where properties are shown, WCT edits those values
- Where just the bean is shown, with no properties, WCT edits the entire bean element.
<bean id="metadata" class="org.archive.modules.CrawlMetadata" autowire="byName">
    <!-- <property name="robotsPolicyName" value="obey"/> -->
    <!-- <property name="userAgentTemplate" value="Mozilla/5.0 (compatible; heritrix/@VERSION@ +@OPERATOR_CONTACT_URL@)"/> -->
</bean>

...

<bean class="org.archive.modules.deciderules.TooManyHopsDecideRule">
    <!-- <property name="maxHops" value="20" /> -->
</bean>

...

<bean class="org.archive.modules.deciderules.TransclusionDecideRule">
    <!-- <property name="maxTransHops" value="2" /> -->
</bean>

...

<bean class="org.archive.modules.deciderules.TooManyPathSegmentsDecideRule">
    <!-- <property name="maxPathDepth" value="20" /> -->
</bean>

...

<bean class="org.archive.modules.deciderules.MatchesListRegexDecideRule">
</bean>

...

<bean id="fetchHttp" class="org.archive.modules.fetcher.FetchHTTP">
    <!-- <property name="defaultEncoding" value="ISO-8859-1" /> -->
    <!-- <property name="ignoreCookies" value="false" /> -->
</bean>

...

<bean id="warcWriter" class="org.archive.modules.writer.WARCWriterProcessor">
    <!-- <property name="compress" value="true" /> -->
    <!-- <property name="prefix" value="IAH" /> -->
    <!-- <property name="maxFileSizeBytes" value="1000000000" /> -->
</bean>

...

<bean id="crawlLimiter" class="org.archive.crawler.framework.CrawlLimitEnforcer">
    <!-- <property name="maxBytesDownload" value="0" /> -->
    <!-- <property name="maxDocumentsDownload" value="0" /> -->
    <!-- <property name="maxTimeSeconds" value="0" /> -->
</bean>

...

<bean id="disposition" class="org.archive.crawler.postprocessor.DispositionProcessor">
    <!-- <property name="delayFactor" value="5.0" /> -->
    <!-- <property name="minDelayMs" value="3000" /> -->
    <!-- <property name="respectCrawlDelayUpToSeconds" value="300" /> -->
    <!-- <property name="maxDelayMs" value="30000" /> -->
    <!-- <property name="maxPerHostBandwidthUsageKbSec" value="0" /> -->
</bean>
Proxy Access
Configuring Heritrix 3 for proxy access also requires editing of the default Heritrix 3 profile.
The default profile is located in the project source:
harvest-agent-h3/build/defaultH3Profile.cxml
The H3 Harvest Agent must be re-built to include any changes to the default profile.
Care must be taken if editing the default profile xml. The WCT Heritrix 3 profile editor relies on a select group of xml elements being present and correctly formatted.
The following properties in the fetchHTTP bean can configured for web proxy access:
<bean id="fetchHttp" class="org.archive.modules.fetcher.FetchHTTP">
    <!-- <property name="httpProxyHost" value="" /> -->
    <!-- <property name="httpProxyPort" value="0" /> -->
    <!-- <property name="httpProxyUser" value="" /> -->
    <!-- <property name="httpProxyPassword" value="" /> -->
</bean>
Running Heritrix 3
Credentials
By default the H3 Harvest Agent is configured to connect to H3 using:
- username: admin
- password: admin
Starting Heritrix 3
- Linux/Unix
./heritrix-3.3.0/bin/heritrix -a admin:admin -j /mnt/wct-harvester/dev/heritrix3 - Windows
./heritrix-3.3.0/bin/heritrix.cmd -a admin:admin -j /mnt/wct-harvester/dev/heritrix3
Stopping Heritrix 3
Heritrix 3 can be stopped using two methods:
- Via the UI. This will notify you of any jobs still running.
- Kill the Java process. Your responsibility to check for and stop any running jobs.
Operation of Heritrix 3
Jobs
Two types of jobs are created in Heritrix 3 by the H3 Harvest Agent:
- Crawl Jobs - standard crawl jobs for WCT Target Instances. Created for the duration of running crawls.
- Profile Validation Jobs - a single re-used job to validate Heritrix 3 profiles created/edited in WCT-Core.
Heritrix management UI
Accessible via https://localhost:8443/engine
Logging
The Heritrix 3 output log can be located in the heritrix-3.3.0/heritrix_out.log file.
Additional notes
TODO Does this still apply?
This Harvest Agent implementation handles the creation and cleanup up of jobs within the Heritrix 3.x instance. You should only see job directories within Heritrix while a harvest is running or waiting to be completed. Once the harvest is complete and WCT has transferred the assets, logs and reports to the Store then the Heritrix job is torn down and directory deleted. The only occasions where a Heritrix job directory will not be cleaned up is if a job fails to build/start or an error has occurred during the harvest. This allows you to investigate the Heritrix job log to determine the cause.
Troubleshooting
TODO
- Gathering information from logs.
- When things don’t work - what to check.
- Heritrix 3 won’t crawl.
- This information might be better presented in a table.
Interacting with Heritrix 3 directly
Heritrix 3 can be operated directly (outside of WCT). Either use the UI or REST API to manually start a crawl. TODO Does this work?
Curl can be used to send actions to H3. See https://webarchive.jira.com/wiki/spaces/Heritrix/pages/5735014/Heritrix+3.x+API+Guide for details on how this is done.
Jobs won’t build
- Check the Heritrix log, heritrix_log.out.
- Is the seed.txt and crawler-beans.cxml being created in the harvest agent base directory, is it being transferred to the H3 job dir location?
- Check file permissions.
Old job dirs not being removed
Occasionaly there are nfs hidden files that prevent these folders from deleting fully. Make sure all hidden files are removed.
Web proxy access
TODO Describe how to deal with web proxy access.
OpenSSL errors with Solaris and Java 7
If running on Solaris with Java 7 and you get openssl errors when the Harvest Agent tries to connect the Heritrix 3.x, try running Heritrix 3.x with Java 8.
Copying issues with larger harvests
If running Apache Tomcat with 32bit Java 7, you may experience issues with larger harvests copying between the Harvest Agent and the Store on completion of a crawl. This was resolved by running Apache Tomcat with 64bit Java 7.
Graceful shutdown and restart
The system can be taken down manually or automatically for maintenance.
To shut down and restart the Core and the DAS, but leave the harvesters running (so that they can continue harvesting when the Core and DAS are unavailable), follow these steps:
- Admin or script shuts down Tomcat on the server that hosts Core and DAS.
- Admin or script shuts down Oracle.
- Admin or script does backup or whatever. WCT Agents continue harvesting.
- Admin or script starts Oracle.
- Admin or script starts Tomcat.
- WCT Harvest Agents re-register themselves with WCT Core, and then copy any completed harvests to DAS and notify Core.
To shut down everything including the harvest agents, then the procedure is:
- Wait until harvest agents have no crawl jobs running and shut them down (either directly or Tomcat container). This can be best achieved by halting all Scheduled and Queued target instances using the ‘Calendar’ icon on the Harvester Configuration screen, and then waiting until the currently running jobs finish.
- Admin shuts down Tomcat on the server that hosts Core and DAS.
- Admin shuts down database.
Restart the system again in the reverse order.
Note that when you shut down a harvest agent, running jobs are lost (when the agent restarts it does not know how to restart the harvest. If you pause a harvest (or all the harvests) then it stays in a paused state on the harvest agent, and is similarly lost when you shut down.
Appendix A: Creating a truststore and importing a certificate
To create a truststore and import a certificate:
First export your public key from your Directory server.
- Refer to the documentation from your Directory server, in order to complete this task.
- If possible export the certificate as a binary file. We will assume your exported certificate is called mydirectorycert.der
Create a truststore and dummy key. Using the keytool provided with the java SDK:
keytool -genkey -dname "cn=dummy, ou=dummy, o=dummy, c=US" -alias dummy -keypass dummy -keystore /var/wctcore/ssl/wct.ts -storepass password
You need to import the X509 certificate for your directory server:
keytool -import -file mydirectorycert.der -keystore
/var/wctcore/ssl/wct.ts
Appendix B: The OMS archive adapter
The OMSArchive bean is only used for the National Library of New Zealand to archive files into their Object Management System. For all other implementations the more generic FileSystemArchive Bean should be used.
To enable the OMS Archive, set the archive property in the arcDigitalAssetStoreService section of wct-das.properties to omsArchive.
#OMS Archive

omsArchive.archiveLogReportFiles=crawl.log,progress-statistics.log,local-errors.log,runtime-errors.log,uri-errors.log,hosts-report.txt,mimetype-report.txt,responsecode-report.txt,seeds-report.txt,processors-report.txt
omsArchive.url= http://omsserver/oms/upload
omsArchive.partSize=1000000
omsArchive.ilsTapuhiFlag=RT_ILS
omsArchive.collectionType=CT_EPB
omsArchive.objectType=OT_WWW
omsArchive.agencyResponsible=AR_NLNZ
omsArchive.instanceRole=IRC_PM
omsArchive.instanceCaptureSystem=CS_HER
omsArchive.instanceType=IT_COM
omsArchive.user_group=4
omsArchive.user=username
omsArchive.password=password
| [1] | Wayback refers to the Java version of the Wayback Machine originally from the Internet Archive. The current incarnation of Wayback is called OpenWayback and maintained by the IIPC. See https://github.com/iipc/openwayback |
| [2] | Wayback refers to the Java version of the Wayback Machine originally from the Internet Archive. The current incarnation of Wayback is called OpenWayback and maintained by the IIPC. See https://github.com/iipc/openwayback |